


Almost a year ago I was given three large panel canvas. The idea was to create a unique piece of artwork for our living room. Rather than being used, however, they have been sitting and gathering dust. Why? Because I couldn’t come up with something I wanted to paint on them. Finishing this painting is one of my year-end goals! I really want to get it done. We considered scenes from places we have been, I considered Star Wars – because I always consider painting Star Wars! I even considered attempting portraits but that seemed crazy given my current art skills. That’s when I ran across something called Acrylic Pouring. I knew almost instantly that this would be perfect for our living room. My husband loves abstract art and we could get a unique piece of artwork that matched our room, looked modern and my art skills could accomplish! It was win-win and it’s this months edition of …
Learn Something New with Kristin
Feature 2 – Acrylic Pouring

This post may contain affiliate links. This means that if you make a purchase after following one of my links I may receive a small commission at no extra cost to you!
What is Acrylic Pouring?
Acrylic Pouring has recently become a popular way of painting. It requires very little drawing related skills but produces amazing and beautiful pieces of artwork. The main point of fluid art like this is to mix paint together, make it thin enough to flow well and pour it onto a canvas. You then tip the canvas and let the paint merge, run and cover it. For different effects, you can add additives to the paint. Sounds really simple right? It is! And it can be done in several different ways. I did some research before starting this project and chose to try three of the most talked about methods which I will explain below. Each method produced vastly different results and I certainly learned a few things along the way!
Since I didn’t want to learn Acrylic Pouring on my large canvas I used three smaller ones for this experiment. I also used cheaper paint because why use my expensive stuff when I’m just figuring it out? Despite the cheap paint and canvas, however, I am pretty pleased with how these turned out and even better? I know which method I will be using on my large canvas.
What Equipment do I need?
There seems to be a lot of debate over exactly what your need for Acrylic Pouring. Although the basics are the same, everyone seems to have a different favorite additive and searching Pinterest will give you plenty of cheaper homemade options for those same additives. As with all art, it seems personal preference comes into play a lot. Here is what I used to create my experimental art.

The Basics
- 3 Canvas Panels – *Note, these did warp a bit while drying. They were easy enough to straighten out and frame.But, if I wanted to hang them without a frame I would invest in canvas stretched over wood. Something like these with cardboard taped onto the back to prevent the canvas from stretching or sagging between the frame would probably work.
- Acrylic Paint – As with any painting the better quality your paint the better your results. It is recommended that you used High Flow Acrylics for fluid art but they can be pricey. I was not disappointed with the results from my cheaper paint but I probably would have had to use less pour medium if I had gotten the more expensive type. The cheaper paints still produced bright colors and mixed well. But, I will probably buy the higher quality paint when I do my living room project.
- Solo Cups – For mixing your paints and holding your canvas while you paint.
- Popsicle Sticks – Also for mixing your paint
- Disposable Cooking Trays – Acrylic Pouring is messy. You will want a tray or a box to catch the extra paint.
- Garbage Bags or Plastic Sheeting – Protect your floors. You’ll be thankful.
- Disposable Gloves – I did not use these. I spent 15 minutes scrubbing my hands after. Lesson learned.
Addictives & Options
- Liquitex Professional Pouring Medium – I used two bottles of this for three small 8×10 Canvas. As stated above I probably wouldn’t have had to add so much if I had been using the higher end paint. This stuff was very easy to mix, however, and it gave my end result a beautiful glossy shine that I absolutely love. It also states that it helps prevent ‘craving’ which is cracks in your paint as it dries. None of my paintings developed any cracks in the drying process so it seems like it works.
- 100% Silicone Treadmill Lubricant – This is supposed to help you create ‘cells’ of color in your painting. I used it in one of my trials and did see some moderate cells compared to the other paintings. I will be using it for my living room painting for sure. Thankfully you don’t need much of this. Just a few drops per paint color.
- Heat Gun – I used this because we happened to have one in the house and several tutorials stated it also helps with the creation of cells. I am not sure if it helped or not. You could probably get away without using one of you don’t have one handy.
How Do You Do It?
As mentioned above there are many different methods of Acrylic Pouring. I will detail the three I used – Flip Cup, Dirty Pour, and Puddle Pour. Before we get to that, however, the initial steps of mixing the paint and preparing your workspace are the same for all three methods.

Mixing the Paint
You want your paint consistency to be pretty thin. I started with a 50/50 mix of paint and Liquitex pour medium. However, when I tried my first flip cup attempt the paint proved to be too thick so I had to add more. Add the pouring medium until paint runs off your stir stick with the consistency of thin gravy. You don’t want it to act like water but it needs to spread pretty well.
The amount of pour medium you will have to add will depend on the paint you are using. You might have to do a few tests before you get a feel for how thin you like your paint. A tiny disposable cup and some throwaway bits of cardboard would probably work fine for this. Repeat this for each color you plan to use in your painting.
Once you get your paint thinned to your liking add a few drops of the silicone to each color. Give it a slight stir.
Preparing the Paint Cup
If you are planning to do a Puddle pour leave your colors separated in their own cups. For the Dirty pour or Flip cup, you will be mixing the colors together in a clean cup. Pour small amounts of all the colors you want to use in this new cup. Continue adding the colors in differing amounts and orders until all the paint is in one cup. Give the mixed cup a very small stir. You don’t want to stir the colors too much or you risk making things muddy. You just want the colors to interact a small bit.
Preparing Your Workspace
Lay down a good bit of plastic sheeting. You’re going to be pouring paint, it gets messy. Lay down one of the large baking trays you bought. This will be your catch tray, the place where (hopefully) all the extra paint goes when it falls off your canvas. Turn a few disposable cups upside down and put your canvas on top of it so that it is sitting on your catch tray.
If you plan on doing more then one canvas it might be helpful to set up a safe place for them to dry. I laid some plastic down on another table and used an old box to transport them from the workspace to the drying area. This way I didn’t have to worry about paint dripping on the new floor.
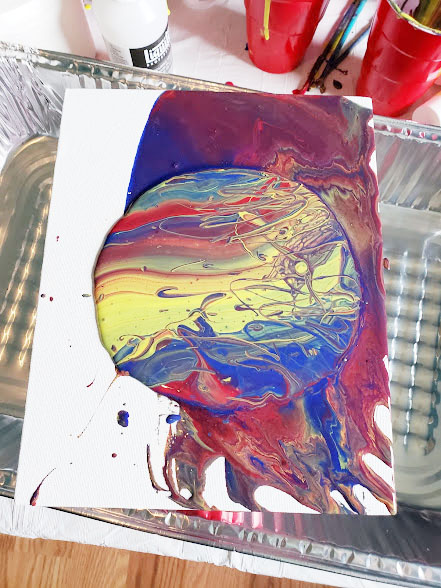
Acrylic Pouring – Method 1 – The Flip Cup
The Flip cup was probably the most fun method of Acrylic Pouring that I tried. It was also the first. I did not use the silicone in this attempt and on my first try, the paint seemed too thick. As a result, I had to attempt this pour twice. While the painting was still interesting I think the colors would have been less muddy if I hadn’t of messed up the paint consistency. Still, that was the point of these experiments!
There were also very little cells visible in the end painting. This makes me think the silicone is definitely necessary and helpful in creating them.

How to do a Flip Cup Acrylic Pour
A flip cup pour is very easy!

- Take your canvas and place it upside down over your paint cup. The front of your canvas should be facing the paint.
- Use one hand to hold the paint cup and the other to keep your canvas secured to the top and flip it over.
- Place the canvas on your workspace. Let the disposable cups you placed on the tray keep your canvas off the bottom.
- Your paint cup should now be sitting upside down on top of your canvas. When you are ready, pick up the cup and let the paint come out. It should spill out into a puddle.
- Let the puddle spread for a few moments and if you are using one hit it with a heat gun for a few moments.
- Tip your canvas so that the paint starts to spread out towards the edges.
- Continue to tip your canvas until you like the look of your creation and the canvas is covered.
- Set aside to dry.
Acrylic Pouring Method 2 – Dirty Pour
The Dirty Pour was the second method I chose to try. It wasn’t as fun as the first method, no flipping involved! But, I like the results much better. This could be because I chose to use silicone for this experiment and could see visible cells in my painting. It could also be because I had figured out the paint consistency by this time. I will have to do more experiments to find out for sure! For the moment this is the method I think I will use for my living room painting.

How to do a Dirty Cup Pour
A Dirty Cup Pour is even easier than a Flip cup!
- Set your canvas face up in your workspace. Use a couple disposable cups to keep it off the bottom of the catch tray.
- Take your cup of mixed paint colors and pour it into the center of the canvas. Feel free to use random motions. A Dirty Pour is literally just pouring the paint onto the canvas!
- Let the resulting puddle spread for a few moments and, if you are using one, hit it with the heat gun for a few seconds.
- Tip your canvas so that the paint flows towards the edges and covers your canvas.
- Set aside to dry.

Acrylic Pouring Method 3 – Puddle Pour
The puddle pour turned out to be my least favorite of these paintings. I used silicone on this pour but still did not see any cells develop. Although the colors of this painting are very nice and vivid, unlike my flip cup attempt (my youngest liked it a lot) they didn’t have the same intrigue as the Dirty Pour method. I didn’t find it as fun to do either. Perhaps it’s just a method that takes more practice? I have seen some nice paintings made using this method, I just wasn’t impressed with mine. I probably won’t be considering this for any paintings in the house. But I might try it again at a later date.

How to do a Puddle Pour
- Set your canvas face up in your workspace. Use a couple disposable cups to keep it off the bottom of the catch tray.
- If you followed the instructions above for getting your paint ready you should have multiple cups of different colored paint on your workstation.
- Pick a color and pour a small puddle or two of it on your canvas.
- Pick the second color and make more puddles, add puddles on top of other puddles.
- Continue until you have used as much paint as you like. The end result should look like a bunch of puddles within puddles.
- Tip your canvas so that the paint spreads out towards the edges and covers your canvas.
- Continue to manipulate the canvas until you have a look you enjoy.
- Set aside to dry.

Acrylic Pouring – The End Results
I was very surprised at how well my Dirty Pour painting came out. Since this was my first attempt at acrylic pouring I was expecting results like my muddy flip cup and vivid but somewhat boring puddle attempts. That I came away with a painting I actually really like was a surprise. It also proves that this is a painting method that anyone can enjoy! Not all of your attempts will come out perfectly but its a lot of fun!
I even think this is an activity that kids of any age could try (minus the heat gun step) – provided they wore old clothes and you doubled the plastic sheeting! It’s pretty messy (seriously wear the gloves).
 < />
< /> < />
< />
How creative!.. love how You explain super detalles processes
Thank you! I hope a lot of people find it helpful as it was a lot of fun to do and the results are pretty awesome.
Thank you for this post! I’ve seen many acrylic pours but never knew the process. One to try out for sure! Your pours look great! 💕
Thank you! I’m glad you found the post helpful!
Wow, I love that. It seems like loads of fun and you can have your own piece of modern art on the wall. I’d like to try that!
You should give it a try! It’s pretty fun, I’m already planning out my next few attempts.
I can’t believe how good these pieces turn out! They look so good and I think I could actually make one myself
I know right? when I discovered Arcylic pouring I expected it to be much harder! the art always looked so pretty I expected there to be some difficult to do process. But its so simple and so lovely! You should definitely give it a try!
very informative!
thank you!
Great walk through of this process! I’ve seen so many videos of the process but they are all sped up or non thorough, so this is super cool
I am glad you found it helpful!
Wow, I love this post so much! Your artwork is awesome, I love how colourful and abstract it is 😍. These would look fantastic on the wall. I’m bookmarking this to come back and try sometime, it looks like so much fun and the results are fabulous! Thank you for sharing! 💖 xx
Bexa | http://www.hellobexa.com
Aww! Thank you so much! You really should give it a try! It was so much fun and the results were so varied and surprising!
Wow, these look super neat. I think I’m going to have to try something like this this summer. Looks like fun. I bet the boy would love to do it as well. Will need to add this to my craft idea and supply list.
It is a lot of fun! Just put down lots of plastic haha.
I always wanted to paint., I’m not so inclined.
This is a great way to try it out!