


Sculpting is an art form that has intrigued me since I was a little kid. There is something pretty awesome about taking a lump of nothing and turning it into something artistic. As kids, we explore this with play dough but as adults, a lot of us forget to keep our creativity alive. I hope these tips for sculpting with air dry clay will persuade you to keep your’s flowing!
I feel like following creative pursuits is a big part of living a positive and happy life. Trying new things, working with my hands and constantly coming up with ideas keeps my mind sharp and my heart happy. Creativity is a lot like a muscle in that the more you use it the easier it gets to think outside the box and come up with fun ideas. Contrary to popular belief you don’t have to be an artist to be creative either! Check out some of our simple DIY Dollar Store crafts or the fantastic creations you can make with pour painting if you don’t believe me!
Learn Something New With Kristin
Feature 13 – Tips for Sculpting with Air Dry Clay
This post may contain affiliate links. If you make a purchase after clicking one of the links I may receive a small commission at no extra cost to you. This is a collaborative post.
Why Choose Air Drying Clay?
It’s Cost Effective
While I would love to try true pottery with a pottery wheel and kiln. The supplies and room required for such a set up just aren’t currently practical. I have seen local classes offered in the past but the prices can be quite steep. Perhaps someday I will be able to give it a try.
But! In the meantime air dry clay works very well! I can get several pounds of it on Amazon for about 15 dollars. Add some basic tools, a touch of water and a non-stick work surface and your good to go!

It’s Convenient
Air dry clay is available in almost any craft store. Even if you don’t have Amazon Prime it’s likely you can find it locally. You can paint it with acrylics (which are also very cost effective!) and you can dry it on your kitchen counter without any sort of fancy equipment. You don’t even have to bake it in the oven like polymer clay.
It’s Very Forgiving
Even if you have no idea what you’re doing or you completely mess up your design it’s very easy to fix. You can pull pieces off and start over, you can revive old clay with a bit of water and repairs are simple and easy to mask. My project might not be perfect but having such an easy to repair and manipulate medium makes it a fun and stress-free task!
Tips for Sculpting with Air Dry Clay from a Complete Beginner!

Set up a Non-Stick Work Surface
Professional sculptors use a baseboard to create their sculptures. This board of varnished wood gives you a nice stable work surface that the clay doesn’t stick too. It can also be moved around as needed with ease. If you plan on making many sculptures or find you really enjoy working with air dry clay then this might be something worth investing in.
For my project, I just used a bit of wax paper. Since I chose to sculpt over a light switch plate I didn’t need additional support while moving it around. I expect a bit of wax paper taped to a book or a bit of wood would work very well if you do!
Keep Some Water Handy!
A small dish with water and a rag is very useful! A bit of water on your fingertips works great to smooth out the surface of your creation or blend together a joint.
Working with clay is far messier than working with playdough! It gets all over your fingers, your workspace and anything you drop it on. Little pieces tend to dry out quickly and crumble apart to get everywhere. thankfully it also cleans off pretty well with water and a rag!
*You can also use water to help fix cracks. When drying some sculptures develop cracks. Mixing a bit of extra clay with a touch of water makes a great crack repair. Simply spread the wet clay into the cracks and let it dry.

Pick A Simple Project to Start!
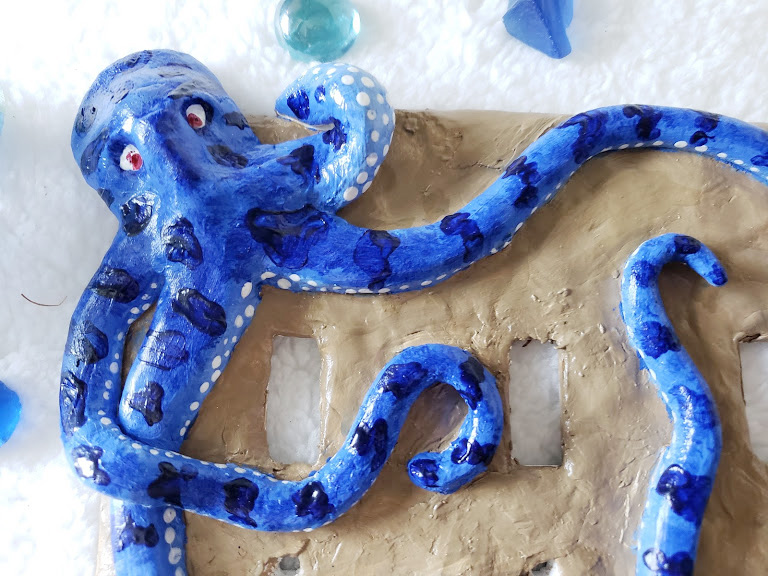
I chose to make a fairly simple project for the first time. Rather then a full free-standing sculpture I chose to cover a light switch plate. Typically the package of your clay should tell you what type of surfaces it will stick too but generally, any non-porous surface will work.
Choosing to cover the light switch plate meant I didn’t have to worry about armatures or bulking (adding support and filling thicker spaces within the sculpture). The relatively flat surface meant I could keep the thickness of my clay to a minimum as well – the thicker your clay the longer it takes to dry! I expect you could also cover a vase or something similar with good results.
I picked an octopus because it’s a relatively simple shape (if you can make playdough ‘snakes’ you can probably create an octopus) and it matches the beach theme for my bathroom. Pick something that isn’t going to overly frustrate you while learning to work with a new medium.
Keep Your Sculpture’s Future Home in Mind
If you plan on setting your sculpture someplace damp or outdoors you might want to consider painting and sealing it. Once your clay is completely dry you can paint it with acrylics and use a sealer to make it waterproof.

Store Your Sculpture and Extra clay Properly
We all know that sometimes life gets in the way of crafting. If you get interrupted while sculpting or can’t finish your project in one session then wrapping it in a damp cloth covered in plastic wrap should keep it airtight and workable for the next session.
To save extra clay for another project wrap it in plastic wrap, store it in an airtight container and keep it in a cool dark place!

 < />
< /> < />
< />
I would love to try to do clay work with a kiln one day, but air dry clay seems like a great easy alternative. Plus it still let’s you do similar projects without a huge investment in materials and equipment. That light switch cover turned out great!
Same! Someday I want to take a class or something but for now, this satisfy’s my desire to try it! Next project is a full sculpture I think!
This turned out so great. I remember I did this kind of sculpting back in school.
http://www.fashionradi.com
Thanks! It was a lot of fun! It’s nice to revisit childhood fun now and then!
Twenty years ago, I sculpted my first, and last, piece of art. Consulting photographs, I sculpted my son’s head and made a doll for his mom for Mother’s Day. I was pleased with the results, sort of. It was a very cute baby doll, and resembled him, but I wanted it to look more like him. I also made the mold and poured the porcelain slip. A friend fired it for me in her kiln and I bought arms and legs and a body kit to complete it. Now, I want to make a doll for my wife for Christmas. I’m going to attempt to sculpt her when she was 3 years old. Trouble is, I don’t remember how I did any of it, so it’ll be my first attempt once again.
That sounds like an amazing gift! There is nothing quite like gifting an ie you poured your time and heart and soul into rather hen just picking it out at the store! Good luck with your Christmas idea! I’m sure it will come back to you!
Hello Kristin. I had worked with regular polymer clay for several years until my arthritis kicked in. Now I’m going to try the air dry clay. Thank you for the tips.
I need to try polymer clay at some point! I’ve always shied away because of having to harden it in an oven but it would be interesting to see the differences between them! Hope the air-dry clay works out for you!
How much clay did you use?
The only clay I can find that’s air dry either cracks a whole bunch after it’s dried, or the small details don’t show up after it’s dried and just looks cartoony.